|
=Rounded Cables For Free=
Well yeah
its not 100% free coz u still have to buy urself an IDE cable but there is no working computer in the world that doesnt have
at least one IDE cable right? Anyway all u need to turn your wide IDE cable to one of those expensive rounded cable is an
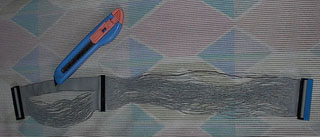
electrical tape, a cutter, and a steady hand (Im serious).
You start
by gently slicing thru the cable, precisely in between two of those thin strips of wire. Just cut an opening that is big enough
so u can start pulling it with ur fingers. Do the same with the rest of the wires until u've sliced thru all of them. Then
pick ur electrical tape up and cover the wires as tight as u can BUT leaving an inch (or so) in the middle w/o an electrical
tape to serve as ur bending space so as not to make ur cable too stiff. You can view what ur home made rounded cable is going
to look like on my modified casing below this page.
***Be
careful when pulling the wires with ur fingers. They sometime tend to lose direction and start to expose the wires from inside.
When that happens use ur cutter to straighten the line up, then resume with the pulling of the wire.
**Do
not put a tape too close the end of the cable. Doing so will make the cable ends stiff and will make the ends easier to bend
and will also prevent the cable to become damaged.
*You
can also alternate the wires when cutting. It is really not required to cut or separate all the wires on the cable. It is
just the best way to minimize its size. But if u don't have the time nor patience to do that, u can cut in between the wires
every 2 (or more) wires.
=Fix The Power Supply Cables Up=
We all
know that the power supply have dozens of thin wires coming out of it right? While we can just leave them scattered everywhere
inside ur system connected to ur hardwares power socket, why not tie em all up with a thin wire or a thread? Doing that will
help cool air to rise up the case and cool your processor down.
=Re-arrange Your Add-On Cards=
Arranging
your add-on cards so that the smallest card is sitting above the biggest is also going to help prevent cold air from being
trapped underneath ur casing. Do I need to further explain this one? no? I thought so =)
=Create A Tube For Your In-Take Fans=
Although this tip is optional, this is still going to help cool ur hardware a lot better. You must remember that if
u really want to keep ur casing cool, u have to attack heat from its source. So if u create a tube from ur in-take fan to
lets say ur processor, the processor is going to run at a much lower speed than having a fan blowing all over the place w/o
a tube directing it to a certain target. Doing that will not only cool ur processor down, but also going to lower the temp
in ur entire case coz the processor will have less heat to spread in ur casing. You can do the same for ur other hardwares
like add-on cards etc. I also recommend that u create a tube that is slightly facing upwards for ur in-take fan that is positioned
on the bottom of ur case so that cold air will be forced to climb up and cool ur add-on cards and processor down (will be
further explained below).
=Seal Those Holes=
A casing
should be sealed off from any other holes (except those from ur intake/outtake fans ... duh!) so that ur casing will have
a vacuum effect and also to make sure that unwanted cold/hot air isn't going to go in/out ur casing. I also recommend to seal
off the sides of ur fans with a tape to further improve their effectiveness. Do this ONLY if u have sufficient fans installed
in ur system.
=Give Your Hardware Some Breathing Space=
Arranging
ur add-on cards so that there is enough space in between them for air to pass thru will also help lower their temp (same thing
applies with ur CD-ROM and HD drives). If u don't have a lot of add-on cards, arranging them so that there is at least one
empty slot in between them is a good idea. If that is not possible, arrange them so that the most expensive or the card that
has a fan (often times a video card) will have enough room underneath it (or whichever side the fan is facing) so that air
can pass thru the fan w/o any obstacles.
=CPU Cooling Softwares=
The effectiveness of these kind of softwares has always
been questioned by a lot of people including myself. But when I started using MSI's "Cooler XP" I was stunned and came into
the conclusion that although there are lots of CPU Cooler softwares out there, only a few of them actually works. If you have
a MSI mobo then check out their website and see if ur mobo model is supported by their Cooler XP software. If not, try other
softwares like Rain, Waterfall, CPU Idle and/or Vcool ... I've heard some pretty good results with those softwares. Be reminded
that some of those softwares requires a separate mobo monitoring software for a more effective and/or better results.
=Keep Your Hardware Free From Dust=
Errr do I still need to explain this one?
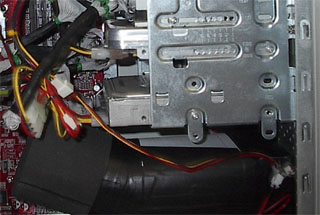
=Modify That Power Supply=
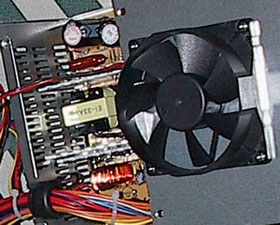
If ur power supply only have a single exhaust
fan (at the back), then I recommend that you modify it and add another one at the bottom part on top of the processor (if
possible). This will force cool air to go up the casing and pass through your processors heat sink to further lower its temperature.
I recommend a LOW RPM in-take fan so that no extra (or only a few) air will bounce back from the power supply to your heat
sink. The pic above shows where to position the extra fan (but not yet installed).
=Mod That Case=
Remember
what I stated above that if u really want to cool ur system down u have to attack the heat from its source? Well that is exactly
what I did with my case! And is what I'm also going to teach you guys here.
First
hardware that were going to attack is our processor. Intel owners really don't have to worry bout their processor coz its
a fact that Intel processors run at a much lower temp when compared to Athlons, so Athlon owners will benefit more from this
mod.
This mod
requires at least 2 empty cd-drive bays for an 80mm fan drive bay mod or 3 empty drive bays for a 120mm fan drive bay mod.
If u do not have at least 2 empty drive bays then I'm sorry but u will not be able to perform this mod. This mod is quite
simple to perform, might be a little bit tricky if u do not have the skills or equipments. In my case, I only used the ff:
-2 drive
bay covers (or 3 if u want to perform the 120mm mod)
-a marker
(a pen or pencil will do)
-a screwdriver
-a drill
-a small
saw (wood or metal doesnt really matter)
U start
off by drawing a circle at the back portion of ur drive bay covers that is the exact size as the diameter of the exhaust fan
(sticking them all together temporarily should help u draw much easier). Then saw off the portion that has to be removed be
careful not to crack the plastic bay cover ok? After that, stick them all together properly aligning the sides so that there
isn't going to be any problem replacing them on ur casing. Once u've done that, place ur fan in the middle of the hole u made
making sure that it is properly aligned, then using a pen, put a marker on the 4 screw holes then drill on it afterwards.
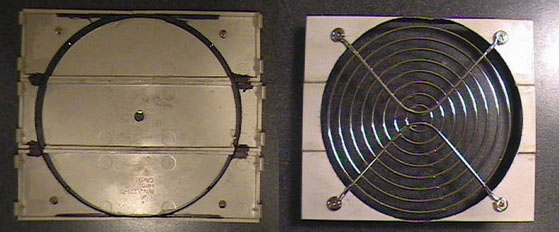
this picture was taken off from some other website. I wasn't able to take photos of my own
drive bay mod so I had to borrow someone else's pic. Left pic shows the marker where the holes are going to be placed. Right
side of pic shows the bay fan already having the hole along with a grill screwed into it.
Then the moment of truth, screw ur fan into ur bay covers a voila! U just made urself a bay
fan case mod! U can also add an optional air filter and/or fan grill I ... have added both with my bay fan.

Now
this is a pic of my own drive bay fan. My fan came in with a square shaped grill and its quite obvious when u look at this
pic coz the upper and lower left part of the fan contains a hollow space or gap ... oh well.
Now for
the add-on card in-take fan. The procedure is also as simple as the drive bay fan mod. But first things first ... if
u have a casing that has an in-take fan bay on the front bottom part of the casing that isn't covered off by the casings housing,
front mask (or whatever u want to call it) then ur a lucky guy/gal. If not then u probably have a casing that looks like mine/this:
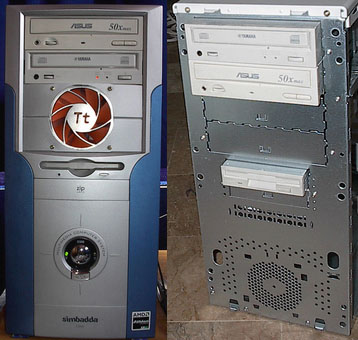
A casing
like the pic has an in-take fan bay at the bottom part of its case underneath the case's front mask. This kind of casing isn't
really the best type/model of casing if u really want to cool down ur add-on cards for obvious reasons. Not only will ur in-take
fan not function on its 100% CFM rating but those holes that is scattered all over the face of casing (shown on the right
side of the pic) will also cause bad air circulation inside ur casing. And if that isn't enough bad news for u that fan grill
is almost covering 50% of the fans air path. But there are simple solutions to alleviate those probs. First solution is of
course to make sure that u buy urself a good in-take fan with high CFM u must remember that not b'coz the fan has a high RPM
(Rotation Per Minute) rating means that it is already a good fan. Bcoz even if the fan turns at a high rate of speed but the
air flow isn't good then ur fan is useless. CFM (Cubic Feet per Minute) is the rating that u should keep an eye on when searching
for a good fan. The higher number, the better. My Thermaltake Smart Case Fan 2 has a very high CFM rating (for an 80mm fan)
of 75.7 some generic fans only has a CFM rating of 38 w/c is acceptable if u want balance between good air flow and low noise.
Next is u have to remove that fan grill ... all of em u ask? YES all of em! After removing the grill u have to patch all those
holes (except of course ur in-take fan hole duh ... again hehe!) so that ur in-take fan will be forced to suck in cool air
from the outside of ur case and not suck in hot air from the inside of ur case and blow it back to ur add-on card. This is
one of the most common mistakes that people tend to do when adding fans they think that by just sticking a fan in ur case
will already do the trick but they end up having a hotter case temp and leaving them asking themselves "what the heck! I bought
an additional fan and the temp is hotter than before?!" Once u've done everything u can replace the case mask back into its
place.
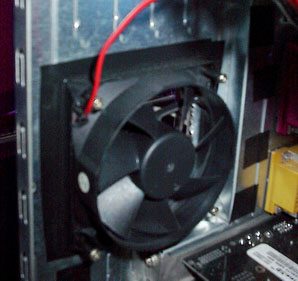
Now it's
time to create a fan tube. It's really quite simple (I think I used that line quite a lot already hehe!). A fan tube doesn't
have to look good as long as the air thats going to flow in it is going to blow air directly into ur add-on cards then everything
is good. Mine looks like this:
It is
only made up of a card-board body covered with electrical tape (so as not to look extremely cheap when viewed from above hehe!).
The tube that is facing upwards is made up of an unknown material that I saw laying around our house. Once u've created a
tube stick it into ur fan and voila! Another modified fan! Just make sure that u seal off the sides of ur fan with a tape
so that the fan will not suck air from the inside of ur case. U may also want to add a filter at either the end of the tube
or directly if front of the fan to minimize the amount of dust that is going to be sucked-in inside ur case.
Now were
almost done modding ur case! The last fan that were going to add is at the upper back part of ur casing. And the amount of
CFM and/or speed of the fan ur going to put there depends will depend on two things. If u want to have a case with a negative
pressure (air blown out of the case is higher than the air that is sucked in by the fans) u have to add an exhaust fan here
that is fast enough to beat the two additional fans u added in front of ur case. Why should u set ur case with a negative
pressure? B'coz the lesser the time air has to sit inside ur casing the less chance of it to heat up and contribute to the
heat ur hardware already have. On the down side, more dust is going to sucked into ur system. So how about positive pressure
(more air in than out)? Dust is going to have a harder time getting in ur casing because the air pressure inside ur case is
higher than the pressure outside but temp might be slightly higher than having a negative pressured casing. Take ur pick!
Just make sure that the fan sides is sealed from gaps just like the lower front fan, and remove the chassis fan
grill if it gets on the way or is blocking too much air path. It should look a bit like this:
That's
it! Were done modding ur case! Hope everything will go well when u try to apply this instructions with ur casing. Goodluck and thank you for visiting my site!
Cooling It Further >>
|
